
My 1/18 6R4 Project
Page 1 of 2 • 1, 2 ![]()

My 1/18 6R4 Project
![]() Admin Tue Jun 25, 2013 5:07 pm
Admin Tue Jun 25, 2013 5:07 pm
So, I thought I would start stripping my Otto 6R4 down the other day which took about an hour and a half to two hours which I thought was very quick. Especially when it was the first time I have stripped down an Otto 6R4 model, and trying to find out how bits and pieces come apart etc. One thing I did find out is that Otto love using plenty of glue/sealant for the models! lol
Anyway I took quite a few pics so to start with here is the model as it stands

First off I took the ariel off the roof of the model, and then turned the car upside down and took the screw off at the front of the car. I then removed the front and rear mud flaps using a stanley knife to prize them off. After that, the base of the model comes away.

When I looked under the model I removed the screw at the rear, and with the help of stanley knife started to prize the engine bay and interior away from the shell.

Here's the car with the engine bay and interior removed

With the engine bay and cockpit removed I then had to use the stanley knife to cut into the glue/sealant to remove the dash.

I managed to take the dash off but caught the top of the fire extinguisher and snapped the handle, but I will fix that so no real problem

Next was to remove the grill from the tailgate.

I then decided to remove the windows as to be honest they were making it quite difficult to hold the model at times because I was worried about breaking the windows. At least I know for next time that removing the windows will be one of the very first items to remove. All part of learning to strip a model like this. I was surprised at how flimsy they are, they are not that thick at all, it is just very thin pieces of clear plastic. My dad can get me some sheets of clear plastic in different thicknesses from his work, so I might have some just to try and see if it is better than the very thin and flimsy windows at the moment. Removing the windows was very easy, just pushing them out from the inside with the stanley knife.

Onto the mirrors, which I used to hate removing on the 1/43 scale models as it seemed no matter how careful I tried to be, I never managed to take the mirrors off with the lug attached, which helped to fit them back onto the model. Surprise surprise no change here! lol Although I will drill the hole slightly and make something to help fit the mirrors back on properly.

Then it was onto removing the front spoiler. It was much easier then I was expecting, just using the stanley knife to loosen it slighty and then abit of patience to make sure I didn't break it.

Onto the headlights, which was very easy to remove the clear plastic cover....

But the headlight unit behind it was a complete pain in the backside to remove due to the rediculous amount of glue/sealant that Otto used to stick them in. After alot of time (and swearing admittedly lol) they came out. I have scratched some of the silver paint but will sort that out before I put them back in.

I then removed the rear lights and the indicator lenses, which were a quick job thanks to the stanley knife (where would I have been in this project without it lol)

Then it was onto the rear spoiler. I was expecting this to be a right pain in the backside and yep, it was. It took me a good 10-15 minutes to remove but I took my time and it paid off in the end.

Next was to remove the windscreen wipers, which also proved to be a pain but I managed to remove them in the end so happy days.
Then the final part was to remove the wheel fans off the wheels which was very easy thanks to yes, you guessed it, the stanley knife

And here is the model stripped apart.

I have to admit I was so chuffed to have stripped it without any major issues, and more importantly not breaking anything. Its strange because when the model is all together the engine bay and interior look very highly detailed, but when its taken out from the model it is very basic to say the least. So the plan is to do some work on making it look better and more detailed.
I haven't done anything with the model since I stripped it down the other day, but to be honest I am in no rush and it will be one of them things that I will work on as and when I feel like it.
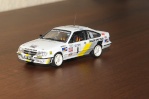
As for what 6R4 I am doing, I am seriously thinking of doing the Rob Lawrence 6R4 from the 1988 Esso Super Metro Birmingham Superprix race which was part of the 6R4 challenge at the time. This 6R4 also competed on rallies but with me been a brummie it would be nice to have a model of a local 6R4 team from the day on the Birmingham Superprix. Thanks to Cowley for the pic below, cheers mate

I have had the idea of buying an Otto 6R4 of Tony Pond from the 1986 Monte Carlo Rally, and converting it into the 1986 Manx Rally winning car (using the wheels from this model). Then I would use the forest wheels from the Pond Monte model on this car and make something from a forest rally. Either way I will keep you all updated with news as and when I have any. Sorry if I have bored anyone with all these pictures and me going on lol
Admin- Admin
- Posts : 350
Join date : 2012-02-06
Age : 40 -

Re: My 1/18 6R4 Project
![]() bmd Tue Jun 25, 2013 7:53 pm
bmd Tue Jun 25, 2013 7:53 pm

bmd- Posts : 6995
Join date : 2012-02-12
Age : 57
Location : here

newt5550- Posts : 6272
Join date : 2012-02-07
Age : 55
Location : Boston
Re: My 1/18 6R4 Project
![]() Simon6R4 Tue Jun 25, 2013 8:07 pm
Simon6R4 Tue Jun 25, 2013 8:07 pm

Simon6R4- Posts : 1144
Join date : 2012-02-06
Location : Ipswich
Re: My 1/18 6R4 Project
![]() Cazzo Tue Jun 25, 2013 8:39 pm
Cazzo Tue Jun 25, 2013 8:39 pm
Looking forward to seeing more of this project

Cazzo- Posts : 1966
Join date : 2012-02-08
Age : 49
Location : N.Ireland
Re: My 1/18 6R4 Project
![]() potiman Tue Jun 25, 2013 9:12 pm
potiman Tue Jun 25, 2013 9:12 pm
Looking forward to seeing more of this project
potiman- Posts : 242
Join date : 2012-02-06
Location : Suffolk

borbase- Posts : 562
Join date : 2012-02-08
Age : 59
Location : geldrop holland -
Re: My 1/18 6R4 Project
![]() Hampton Caught Tue Jun 25, 2013 10:09 pm
Hampton Caught Tue Jun 25, 2013 10:09 pm
Congratulations on a great post - very clear with the photos helping us see the project progressing.
I totally approve of your choice of car. I don't recall seeing anyone making that particular 6R4 in any scale - I may, and probably am wrong, but I've not seen one before.
I've been very successful in removing decals from 1/43 scale windows, so if you need to use more than Microsol to remove sticky stuff (or minor scratches) from any f yours, I'd recommend putting some cold water in a wash hand basin and keeping the 'glass' under water, use very fine grade wet and dry paper, very slowly. That last part is vital - keeping the plastic cold is all important, so vigorous rubbing makes the plastic opaque, which you don't want.
Sorry if you already knew of that technique, and I don't want to sound like I'm teaching an old dog new tricks, but thought it wrth sharing in case it's of use (to you or anyone else watching this thread!).
Looking forward to seeing how progress goes with this project - nice one!!
Cheers, Steve

Hampton Caught- Posts : 2385
Join date : 2012-02-09
Age : 56
Location : near Hampton Court
bmd- Posts : 6995
Join date : 2012-02-12
Age : 57
Location : here
Re: My 1/18 6R4 Project
![]() Mal Wed Jun 26, 2013 10:57 am
Mal Wed Jun 26, 2013 10:57 am
Hampton Caught wrote:
I've been very successful in removing decals from 1/43 scale windows, so if you need to use more than Microsol to remove sticky stuff (or minor scratches) from any f yours, I'd recommend putting some cold water in a wash hand basin and keeping the 'glass' under water, use very fine grade wet and dry paper, very slowly. That last part is vital - keeping the plastic cold is all important, so vigorous rubbing makes the plastic opaque, which you don't want.
With the Otto models, the decals on the windows are just that. Decals. Not tampo print as the plastic is too soft. Just use some sticky tape (or I think you guys call it durex). This should just lift the decals off the clear plastic. If necessary, you may need to use some very fine polish to get the plastic perfect. Try the Tamiya 'Finish' polish with a fine very clean rag so you don't scratch it.
Also Nicky, if you do stuff the windows up when taking them off the Otto models, the clear plastic top from shirt boxes works well when making new windows.
Mal- Posts : 378
Join date : 2012-03-11
Re: My 1/18 6R4 Project
![]() borbase Wed Jun 26, 2013 11:06 am
borbase Wed Jun 26, 2013 11:06 am
borbase- Posts : 562
Join date : 2012-02-08
Age : 59
Location : geldrop holland -
Re: My 1/18 6R4 Project
![]() bmd Wed Jun 26, 2013 12:13 pm
bmd Wed Jun 26, 2013 12:13 pm
bmd- Posts : 6995
Join date : 2012-02-12
Age : 57
Location : here
Re: My 1/18 6R4 Project
![]() newt5550 Wed Jun 26, 2013 4:07 pm
newt5550 Wed Jun 26, 2013 4:07 pm
bmd wrote:for once..................i'm remaining speechless!!!
I get ya Billy
newt5550- Posts : 6272
Join date : 2012-02-07
Age : 55
Location : Boston
Re: My 1/18 6R4 Project
![]() Admin Wed Jun 26, 2013 6:38 pm
Admin Wed Jun 26, 2013 6:38 pm
I had some time today to some more work with the model. Although it isn't really that much, I thought that people might be interested in seeing how I do my work with models. Firstly I got the laptop and scanner ready.

Then I got the windscreen, front windows and rear window, and laid them flat ready to scan.

I haven't scanned the rear side windows as I dont want to risk damaging the rear air intakes. Anyway, I scanned the other windows and have put them into photoshop. I will measure the length of each window and convert the windows in photoshop to the exact size. This will make it spot on for when I print or get printed any window decals or sunstrips. I also scanned in the rear number plate so I know the right size I can print the number plate at. I do have the current UK registration font on my computer for later cars, but will need to find a close font to match the older style number plate fonts.

The last thing I done today, was to take some pics of the shell. I got pics from the front, side, rear and roof. I then loaded the photos into photoshop, and then cut the image down to the widest part of the model in each image. I then measured the width's and converted the image to the exact size. To make sure I was spot on, I decided to crop a logo off each image and see what size it came in mm, which I then measured on the model to see if it was the same size which they were. If they weren't, whatever the difference was, I would either add or subtract from the size of the image. This makes it much easier to get logo's to the exact size on the model, and it also allows me to make any slight size adjustments if there are plenty of logo's on a certain part of the car.

The only thing is that the method I have just used will only be good for some of the logos if I do decide to make the Rob Lawrence 6R4, because there are the 3 thick Burgundy stripes from the rear spoiler going all the way down the side. Im sure I will get it sorted, even if it does take quite abit of time to do. At least I have the template if I do any more models using the Otto 6R4 as a base.
More news soon everyone
Last edited by 6r4nicky on Wed Jun 26, 2013 8:25 pm; edited 1 time in total
Admin- Admin
- Posts : 350
Join date : 2012-02-06
Age : 40 -
Re: My 1/18 6R4 Project
![]() 143models.com Wed Jun 26, 2013 8:05 pm
143models.com Wed Jun 26, 2013 8:05 pm
Will look the dogs when done.
Keep at it..
143models.com- Posts : 476
Join date : 2012-02-08 -
Re: My 1/18 6R4 Project
![]() Hampton Caught Wed Jun 26, 2013 8:18 pm
Hampton Caught Wed Jun 26, 2013 8:18 pm
Another very useful and interesting post. Thanks for letting us into your world!
I tend to have a model in one hand, a ruler in the other, some photos of the car I'm looking to create in my other hands and make boxes, chose background colours and fonts with any spare hand I've got left! Hadn't tried taking the photos and scling up (or down!) the decals from that. Good idea though, and you don't need as many hands as I need!
With the older fonts for number plates, I've experimented with both the 'UKNUMBERPLATE' font and the 'REGISTRATION PLATE UK' fonts I've loaded on to Word (and my desktop publisher) and by changing the font size and spacing between the characters, can do both older and current plates very nicely. Worth playig around with this and also downloading (free of charge) the other font you haven't got.
Hope this helps and thanks again, Steve
Hampton Caught- Posts : 2385
Join date : 2012-02-09
Age : 56
Location : near Hampton Court
Re: My 1/18 6R4 Project
![]() brian Wed Jun 26, 2013 8:35 pm
brian Wed Jun 26, 2013 8:35 pm
Nice to see how other people design their decals. I use a few similiar techniques but i wont derail your thread with them
_________________
Always interested in 1/18 Irish Decals/models

brian- Posts : 1998
Join date : 2012-02-07
Age : 36
Location : Waterford

reeft1- Posts : 3397
Join date : 2012-02-14
Age : 54
Location : Essex
bmd- Posts : 6995
Join date : 2012-02-12
Age : 57
Location : here
Re: My 1/18 6R4 Project
![]() Admin Wed Jun 26, 2013 10:42 pm
Admin Wed Jun 26, 2013 10:42 pm
When Sun star finally release their 6R4, I will get one and do a similar thread if people are interested?
Slightly off topic, but might be good news is that I recently joined a skoda owners forum and there is a chap on there that does skoda stickers of all sizes, external and internal style, and does custom work. I sent him an email earlier asking if he would be able to do stickers if I supplied the art work for models so fingers crossed.
More news soon
Admin- Admin
- Posts : 350
Join date : 2012-02-06
Age : 40 -
Re: My 1/18 6R4 Project
![]() Zeus Wed Jun 26, 2013 11:22 pm
Zeus Wed Jun 26, 2013 11:22 pm
Zeus- Posts : 2535
Join date : 2012-02-06
Age : 41
Location : Wales
Re: My 1/18 6R4 Project
![]() Admin Wed Jun 26, 2013 11:29 pm
Admin Wed Jun 26, 2013 11:29 pm
Admin- Admin
- Posts : 350
Join date : 2012-02-06
Age : 40 -
Re: My 1/18 6R4 Project
![]() Admin Fri Jun 28, 2013 9:52 pm
Admin Fri Jun 28, 2013 9:52 pm
First off, I realised that I could remove the grill from the model, so first was to get a small screwdriver behind the grille. I did have a screwdriver at each side some times to help prize it off instead of breaking the grille.

As you can see, there are 2 slots that the grill goes into which all helps, especially when putting all of this stuff back on the model later on in the build

The other item I forgot to take off the model aswell, was the vents for the door pods. All I used was a pin which didnt need much effort to get them out.

Then, I thought I would be best to make a couple of reference's to the thick Burgundy stripes that go from the top of the rear spoiler all down the side at an angle finishing at the bottom of the car, just before the door. What I decided to do was first off, sellotape the window and rear spoiler back on.

Then I got some masking tape, and got the correct (or as close as I could) lines to match the real car. I decided that when I got to the fold, from where the main body and rear arch join, I would cut it using my stanley knife. I then made a line going from the rear arch at the same point down the arch to the bottom of the car. I found that if I tried to do it in one big stripe, that it was going slightly off line abit so didnt want that. I know you can see in the image that there is a slight gap, but that is no problem as I will be doing the black rubber strip that goes on the rear arches, so no one will notice

My next job was to take all the decals off. This was very very easy, using my finger to get the decals off the model. This is how the model sits at the moment. I have got to give the model a wipe over with a wet cloth tomorrow, to get all the bits of decal off.

My last job for tonight was going on google to get some logo's that I need to do the decals. I have found the rover logo (very easily and in a very hi resolution too!) and the freight rover logo (although thats very low quality so will draw that myself) The one logo I couldn't find was the BBC Radio WM logo from the late 80's but luckily I have the 1988 Birmingham Superprix event programme, which I am sure it is in. I will scan that in and draw that too.
I wont be working on the model as I am back at work tomorrow night, but I finish on tuesday morning so will be back onto it either tuesday afternoon or wednesday. I will be stripping the paint off the model, which after spending alot of time this afternoon doing research I have got a cleaner that apparently gets paint off resin, plastic and metal models and doesnt damage resin, or melt it. Alot of people on warhammer forums swear by it in this country as most of the warhammer figures are made from resin. Just fingers crossed it works and doesn't melt the 6R4 lol
More news very soon, have a great weekend everyone
Admin- Admin
- Posts : 350
Join date : 2012-02-06
Age : 40 -
Re: My 1/18 6R4 Project
![]() Hampton Caught Fri Jun 28, 2013 11:15 pm
Hampton Caught Fri Jun 28, 2013 11:15 pm
Excellent thread, this one!
Perhaps it's worth having a go at the pintwork on somewhere that's not going to notice. Is the resin red and the only paint yellow or is the red painted on too? If so, the area behind the grill would be a good place to experiment with the paint remover!
Can the door pods come off? I ALWAYS remove them from my 1/43 scale models so they don't join up with the rear wing. I want them to look like they are separate from the door and that it could open without dropping a fine, black decal along the join! Far better to remove the pod if you can.
Good going that man! Cheers and speak soo, Steve
Hampton Caught- Posts : 2385
Join date : 2012-02-09
Age : 56
Location : near Hampton Court
Re: My 1/18 6R4 Project
![]() gerardwrm Sat Jun 29, 2013 9:35 am
gerardwrm Sat Jun 29, 2013 9:35 am
and also very interested in Your Skoda Decal maker story .......
Please let the update come !!

gerardwrm- Posts : 305
Join date : 2012-02-18
Age : 63
Location : Zoelen Holland -
Page 1 of 2 • 1, 2 ![]()
» my projects
» Project " X'" RMC 2014
» GMRs project progress
» Focussimo's project